MIOS32 Bootloader for Newbies
The MIOS32 Bootloader allows you to upload a MIOS32 application into the internal flash memory of STM32F1, STM32F4 and LPC17 via USB or UART based MIDI interface.
The big advantage of the so called bootstrap method is, that you don't need a programming device like JTAG or a COM port to install or update the software on your MIDIbox. Instead you can
- STM32F1: buy a preprogrammed STM32F103RE from SmashTV (already presoldered on a MBHP_CORE_STM32 PCB) for a reasonable price, or you can ask a friend or a member of the MIDIbox Forum who already owns the equipment for flashing the firmware into the STM32.
- STM32F4: use the ST-Link which is part of STM32F4DISCOVERY evaluation board to flash the bootloader via USB based JTAG
- LPC17: use the LPC-Link which is part of LPCXPRESSO evaluation board to flash the bootloader via USB based JTAG
This only has to be done once! The details are explained in the Experts Section.
The bootloader brings benefit even for people who own this equipment, because the usage is faster and more comfortable; it's possible to upload new code on-the-fly without opening the MIDIbox case or plugging cables within a few number of seconds! Speaking about upload performance: an upload via USB MIDI is usually faster than via JTAG (ca. 13..17 kb/s on a STM32F1, ca. 50 kb/s on a STM32F4, ca. 20..40 kb/s on a LPC1769)!
In distance to MIOS8, the bootloader, MIOS32 and the application itself are provided as a single binary. This means: once any application has been flashed into the STM32/LPC17 chip, the bootloader will be available for future code uploads via MIDI as well.
Starting the Bootloader
The bootloader is started on each STM32/LPC17 power-on reset, or during runtime if a special SysEx command is received. It sends an upload request, waits 3 seconds for a response (if the fastboot option isn't enabled), and thereafter starts the actual application. The temporary activation after power-on is provided as a fallback solution; it allows you to replace a faulty application which hangs up or blocks the MIDI interface.
For MBHP_CORE_STM32 and MBHP_CORE_LPC17, upload via common MIDI cables (UART based MIDI interface) plugged into MIDI IN1/OUT1 sockets is always possible. This option is not supported by the STM32F4DISCOVERY based variant due to memory limitations in the bootloader range.
Upload via USB (the fastest method) requires some special measures, as the USB MIDI device won't be enumerated fast enough by the host operating system (e.g. Windows) after power-on:
- upload via USB interface can be started during runtime if the application configured it for MIDI (this is mostly the case) and doesn't crash on incoming MIDI streams (should be mostly the case for released applications)
- if the application uses the USB interface for other purposes (e.g. Virtual COM), or the upload doesn't work for any reason (e.g. due to a bug during program development), the so called "boot hold" mode can be enabled during power-on. Once in hold mode, a special USB MIDI device will be available (called "MIOS32 Bootloader") to upload code. The application will be started once the jumper has been removed again. It is recommended to power-cycle the core thereafter to get a proper USB connection (under Windows), and to restart MIOS Studio, so that it sees the new USB MIDI port ("MIOS32" instead of "MIOS32 Bootloader").
How to enter this mode:
- MBHP_CORE_STM32: stuff jumper J27 (Boot1) module to select the bootloader hold mode (J23 aka. Boot0 should *not* be stuffed!), thereafter power-cycle the core.
- STM32 Primer: solder a small cable between the boot1 signal on R48 and Ground as shown in this picture. However, the Primer contains an integrated debug interface which makes it easy to recover the MIOS32 installation w/o this measure.
- MBHP_CORE_LPC17: stuff jumper J27 (BL Hold) to select the bootloader hold mode, thereafter power-cycle the core.
- MBHP_CORE_STM32F4 and STM32F4DISCOVERY: press and hold the blue "User" button, trigger the black "Reset" button shortly. This will restart the core and enforce bootloader mode as long as the blue "User" button is pressed.
Code Upload
 |
 |
Download MIOS Studio - this is a Juce based environment with MIOS specific tools which runs on PCs and Macs. |
If no error has been reported by the upload tool (to ensure this, scroll up the log window and check all status messages), it can be assumed that the application has been installed successfully. Note that it is not possible to run multiple applications in parallel - a new application will always overwrite the old one.
Note: if you are using the USB interface under Windows, it is required to restart MIOS Studio whenever the core has been power-cycled, resp. the USB MIDI Device has been enumerated again. You probably know this issue from your other USB MIDI interfaces as well. This measure isn't required when you are using MacOS or Linux.
Another typical Windows issue: instead of "MIOS32", the USB device is probably called "Audio Device" or in german "Audiogerät", and you have to close all MIDI applications which could access the same port, as the legacy Microsoft MIDI USB driver isn't multi-client capable (no issue under MacOS/Linux).
Bootloader Parameter Storage
The bootloader provides a permanent storage for parameters which are referenced
by (most) applications. These parameters can be customized from the MIOS Terminal
(part of MIOS Studio) by uploading the mios32_bootloader update application.
After the upload of this app, type "help" in the MIOS Terminal to get a list of available commands.
IMPORTANT: parameter changes have to be stored with the "store" command before uploading a new application, otherwise they will get lost!
These commands are only available in the mios32_bootloader update app, and not in MIDIO128, MIDIbox SEQ, MIDIbox NG or similar - in order to change the parameter, just upload the update app, modify the configuration, and upload the actual firmware for your MIDIbox again.
Explanation of the most important parameters:
- fastboot: normaly after power-on the bootloader waits for an upload request for
ca. 3 seconds before the actual application will be started.
This is a fail-safe measure which is mainly relevant for developers who don't
want to open their MIDIbox and stuff the "BSL Hold" jumper (J27) if the
application crashed during the initialisation phase.
However, for common users this wait phase shouldn't be really necessary, especially
if they are using a stable application.
Therefore: enter
     set fastboot 1
     store
in the MIOS Terminal to skip this phase, and to start the application immediately!
You will like this option! :-)
Note that no MIDI upload request will be sent during power-on anymore!
Please consider this when reading documentation about MIDI troubleshooting.
- single_usb: use this option if you are working with a Windows PC which can't handle
multiple USB ports correctly.
E.g. applications like MIDIO128,
MIDIbox SEQ or MIDIbox NG enable
4 USB ports by default. Certain Windows versions (such as Windows XP) are failing:
sometimes MIDI events get stucked, MIOS Studio filebrowser operations abort with an error message, etc.
Even the installation of the GM5 USB MIDI driver doesn't help (which sometimes solves the issues under Windows7),
or causes new issues when multiple core modules are connected.
As a workaround, it's possible to enforce that only a single USB port is enabled:
     set single_usb 1
     store
This should solve the windows USB MIDI issues - with the drawback of the reduced functionality.
- enforce_usb_device: this option has only an effect on core modules which support USB Host mode such as
the MBHP_CORE_STM32F4 module.
If set to 1, USB device mode will be selected regardless of the cable type A or B.
If set to 0 (default), USB host mode will be selected with A type cables, and USB device mode with B type cables.
This type of selection is also known as USB OTG (on-the-go).
The usage of the default setup is normally save, "set enforce_usb_device 1" only if you are using an "unusual" cable.
Note that setting this parameter could lead to a dilemma: it can only be set with a bidirectional MIDI connection between the core module and the
MIOS Studio terminal. If you don't own a Micro-USB B type cable to establish this connection, the only possibility to change this parameter
is a "traditional" MIDI connection via MIDI IN/OUT between the core module and your PC/Mac!
If you don't own a MIDI interface for such a connection, it's cheaper to buy the right Micro-USB cable - once you've changed the parameter, you can use the "improper" cable for your core!
- spi_midi: this option enables the communication to a SPI MIDI compliant device (such as the KissBox OEM) for MIOS32 applications which support this option. If SPI MIDI is not enabled, the SPI port (usually J16, RC2 chip select) might be used for other purposes, such as communication to an ENC28J60 device!
With "set spi_midi 1" the usage of the SPI MIDI device can be enforced.
- USB device name: it's possible to assign a dedicated name for your MBHP_CORE_STM32
or MBHP_CORE_LPC17 module which is used for the USB connection.
This is especially useful if multiple MIDIboxes running with the same application
are connected to your computer, so that you are able to differ between them.
The USB name can be permanently changed with:
set name
e.g.
     set name MIDIbox SEQ V4 - 1
     store
or
     set name MIDIbox SEQ V4 - 2
     store
- Device ID: this ID is relevant once multiple cores are available on the same MIDI port,
or if you are using your MIOS32 based core as a USB<->MIDI / OSC<->MIDI gateway to a
PIC based MBHP_CORE.
MIOS Studio won't be able to differ between the cores in this case if they have the
same Device ID, therefore it's recommended to change the Device ID of the MIOS32 core
Enter:
     set device_id 127
     store
to assign a new device id
Again: this is only relevant if multiple cores are connected to the same MIDI port.
Changing the device ID is not required if the MIDIboxes are accessed from dedicated USB MIDI ports!
IMPORTANT NOTE: don't change the Device ID if you are using MIOS Studio 2.2.1 or lower!
Device IDs are properly supported with MIOS Studio 2.2.2 and higher!
- LCD Type: applications which are compiled with the "universal" LCD driver can handle
various character/graphical LCD types and display dimensions.
It's recommended to store these parameters of your MIDIbox in the bootloader info range.
Following commands are available:
     lcd_types           lists all available LCD types and their appr. number
     set lcd_type        the LCD type number (enter "lcd_types" to get a list of available types)
     set lcd_num_x       number of LCDs in X direction
     set lcd_num_y       number of LCDs in Y direction
     set lcd_width       width of a single LCD (*)
     set lcd_height      height of a single LCD (*)
     store
(*) CLCDs: number of characters, GLCD: number of pixels
Example: a single HD44780 based 2x20 character LCD is connected to your MIDIbox (default)
Enter:
     lcd_type CLCD
     lcd_num_x 1
     lcd_num_y 1
     lcd_width 20
     lcd_height 2
     store
Example2: two HD44780 based 2x40 character LCDs are connected to your MIDIbox
Enter:
     lcd_type CLCD
     lcd_num_x 2
     lcd_num_y 1
     lcd_width 40
     lcd_height 2
     store
Example3: five SSD1306 based 128x64 OLEDs are connected to your MIDIbox in vertical direction
Enter:
     lcd_type GLCD_SSD1306
     lcd_num_x 1
     lcd_num_y 5
     lcd_width 128
     lcd_height 64
     store
Please note: some applications (like MIDIbox SEQ V4) could overrule the predefined
parameters if they can't handle smaller (or larger) LCD sizes.
Please note also: some applications could have been released with a different
LCD driver (MIOS32_LCD != "universal") which don't consider these parameters.
It's up to the developer to document this limitation.
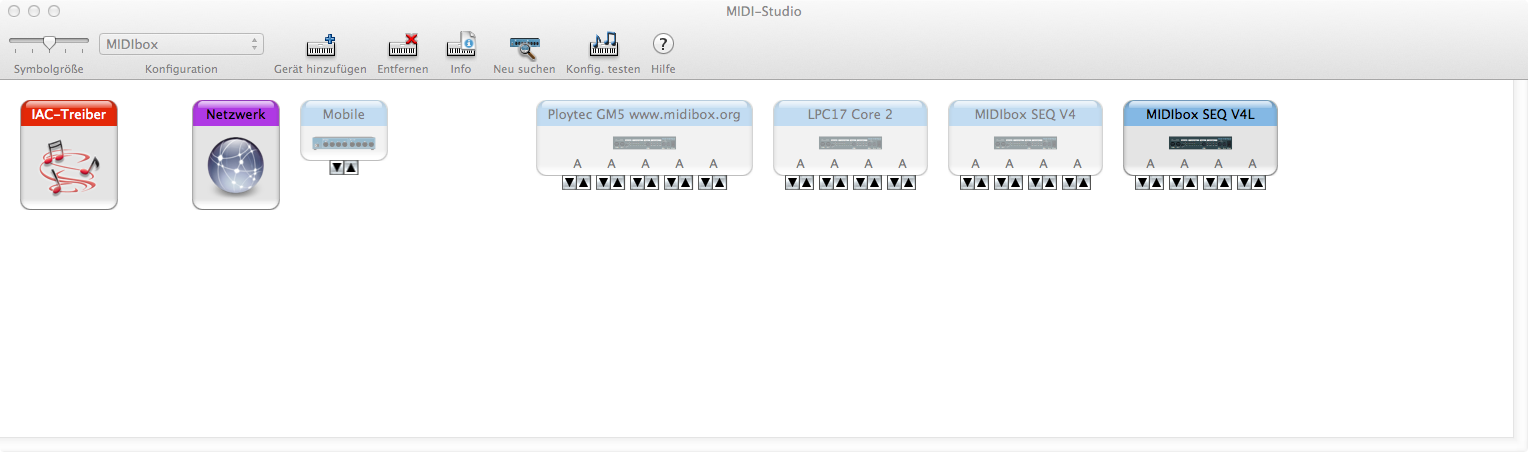
Working under MacOS?
The USB MIDI implementation of MacOS is perfectly working, regardless of the number of USB MIDI ports!
So far we only noticed a minor issue when an app changes the number of USB MIDI ports or the device name. Such changes won't be taken over automatically, instead you've to delete the old interface description in the Audio-MIDI-Setup:
- start the Audio-MIDI-Setup of MacOS (e.g. search for "audio-midi" with Spotlight)
- disconnect the core module from USB
- delete the interface in the Audio-MIDI-Setup
- connect the core module to USB again
Thereafter you should see an interface with the new names and the right number of USB MIDI Ports:
Last update: 2026-05-17
Copyright © 1998-2026, Thorsten Klose. All rights reserved.
|